Helm is one of the four bridge crew roles available to players.
The helmsman is responsible for maneuvering the ship and navigating the ship between and within star systems.
Screens[ | ]
Helm has several views to allow him to navigate and maneuver the ship.
Local Map[ | ]
This view allows the helmsman to maneuver in local space and to target nearby ships.
Impulse Map[ | ]
The impulse map shows planets and points of interest within the system that the ship can navigate to.
Warp Map[ | ]
The warp map shows the systems within the trench that the ship can travel to.
Actions[ | ]
These are the actions that the helmsman can perform.
Maneuvering[ | ]
The Maneuvering controls allow the ship to move forwards and backwards, yaw left and right and move up and down on it's vertical axis. The speed and maneuverability is determined by the power provided to you by the Engineer.
Impulse[ | ]
The helmsman can use the impulse map to select targets within the system to travel to. After the helmsman has selected a target, he returns to the local map, and lines the ship up with the plotted course. After the ship is lined up, and the engineer has allocated enough energy, the helmsman can engage the impulse engine by activating the lever to the left..
Warp[ | ]
Similar to navigating using impulse, the helmsman selects a target on the warp map, then aligns the ship to the plotted course. After the engineer has charged the warp coils, he can engage the warp engines.
Standard operating procedures[ | ]
General[ | ]
- Zoom out the scanner zoom slider to maximize field of view; zoom in when needed, e.g. during close quarters combat
- An exclamation point on the console indicates the current mission target, which may be in another impulse or warp location
- When entering a new area, consider plotting an impulse course that will be the "escape route," and take note of the heading. If an urgent impulse escape is later necessary, helm will already know which heading to turn the ship towards while the computer plots the impulse course again, which can save several crucial seconds during the escape attempt. (An impulse course escape is preferred to a warp course escape because impulse engines can be engaged faster and with less power than warp engines, but a warp course escape may be required when impulse is not an option.)
Communication[ | ]
- Communicate significant changes in heading and/or speed, so everyone knows where the ship is going and why (e.g., "turning to avoid asteroid," "maintaining distance from anomaly")
- Announce new contacts and any significant movements of other ships/objects (e.g., ship approaching, mine ahead, enemy fleeing); helm is the primary set of eyes on the scanners; other stations may be occupied elsewhere, but helm is almost always "looking out the window"
Flight control[ | ]
- The ship can be flown from external view (using keyboard or VR controller). This is useful to avoid collisions in crowded environments (e.g. asteroid fields), and during close ship-to-ship combat ("dogfights"). Occasionally, external view controls will not respond; if this happens, exit external view and re-enter external view; the controls should return.
- Mind the momentum of the ship on turns and stops
- Engine power determines maximum engine speed as well as turn speed; if you need to turn faster, ask Engineering for more engine power
- In Aegis, watch the green circle, it's the detection range. With shields and torpedoes off, the detection range will remain at 10km as long as the speed is 4000 or below; if the speed increases to 5000, the detection range will increase to 20km; if the speed increases beyond 5000, the detection range will not increase further. Obscuring anomalies reduce the detection range.
- Anomalies commonly have an effective range of 17.5km, though some differ (e.g. 10.5km)
Combat[ | ]
- Phasers on most ships only fire forward; in combat, you will usually want to stay behind the enemy while keeping the enemy in front of you; if there are multiple enemies, you usually want to stay behind as many as possible, while keeping as many as possible in front of you
- Keep line of sight in mind, especially in combat: your ship will need line of sight to fire at the enemy, and the enemy will need line of sight to fire at you. Large objects obscuring line of sight may provide an advantage (cover) to you, or to other ships. The scanners may not display objects that interfere with line of sight, so use visual (viewscreen, external view) to confirm line of sight between you and the enemy, especially in crowded situations, such as combat in asteroid fields. If the ship is about to collide with an object, it will appear as a flashing red dot near the center of helm's scanner display
- Reversing the engines will speed up a 180-degree "about face" turn; in close quarters ship-to-ship combat, reversing engines while turning around can keep the enemy ship in the firing range longer
Combat maneuvers[ | ]
The three basic positions of ship-to-ship combat ("dogfighting") are pursuit (your ship's nose is behind the enemy ship's tail), merger (nose-to-nose), and escape (the enemy ship's nose is behind your ship's tail).
Pursuit maneuvers[ | ]
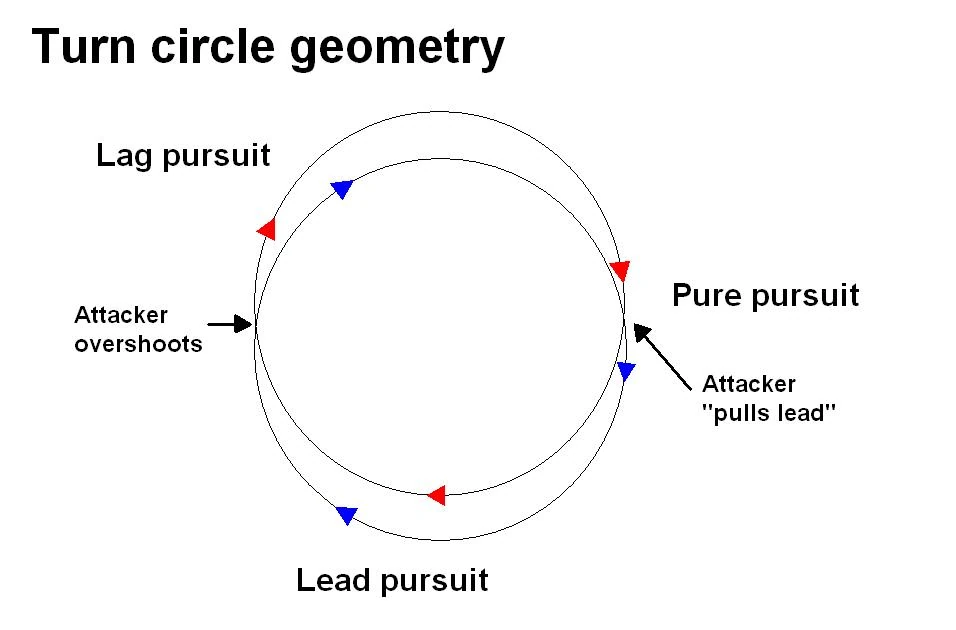
Pure pursuit[ | ]
- Also known as "nose-to-tail," pure pursuit is the ideal combat positioning: your ship's nose is directly behind the enemy ship's tail
- During pure pursuit, the enemy ship's tail will appear in the middle of the viewscreen
- When the enemy ship attempts evasive maneuvers to escape the pure pursuit, maintain lead pursuit and avoid falling into lag pursuit
Lead pursuit[ | ]
- Lead pursuit occurs when your ship and the enemy ship being pursued are both turning, and your ship's flight path is in front of the enemy ship's flight path; your turn circle is "inside" the enemy ship's turn circle
- During lead pursuit, the enemy ship will appear on the "outside" half of the viewscreen
- If you are turning right, the enemy ship will appear on the left half of the viewscreen
- If you are turning left, the enemy will appear on the right half of the viewscreen
- Avoid crossing in front of the enemy ("overshooting") while in lead pursuit
- If the enemy is moving towards the outside edge (or has "fallen off" the outside edge) of the viewscreen, you are at risk of overshooting
- Decrease engine speed and/or rate of turn to avoid overshooting
- Ideally, during lead pursuit, the enemy ship will slowly be moving towards the centerline of the viewscreen, as you re-establish pure pursuit; however, if the enemy ship is moving too fast towards the centerline of the viewscreen during lead pursuit, it will cross over the centerline into the "inside" half of the viewscreen, and your lead pursuit will become a lag pursuit
Lag pursuit[ | ]
- Lag pursuit occurs when your ship and the enemy ship being pursued are both turning, and your ship's flight path is behind the enemy ship's flight path; your turn circle is "outside" the enemy ship's turn circle
- During lag pursuit, the enemy ship will appear on the "inside" half of the viewscreen
- If you are turning right, the enemy ship will appear on the right half of the viewscreen
- If you are turning left, the enemy will appear on the left half of the viewscreen
- Avoid "losing" the enemy during lag pursuit and allowing it to escape your firing arc
- If the enemy is moving towards the inside edge (or has "fallen off" the inside edge) of the viewscreen, you are at risk of losing the enemy
- An enemy lost during lag pursuit may come back around and enter a pursuit position behind you, or face you and initiate merger, depending on distance
- Increase engine speed or rate of turn to avoid losing the enemy during lag pursuit, and to re-establish pure or lead pursuit
- Alternatively, a reverse engine turn may help recover an enemy lost during lag pursuit, or at least establish a merger position rather than allowing the enemy to take pursuit position behind you
- On the Aegis, engine intrusion may assist in correcting lag pursuit, by slowing down the enemy ship
Mergers and circle flow[ | ]
Mergers[ | ]
- A merger occurs when two ships flying towards each other ("nose-to-nose") cross flight paths (the "merger point")
- After a merger, both ships will typically turn, and either one ship will gain a pursuit position over the other, or both ships will begin circle flow
- Both ships will typically fire weapons during a merger; for this reason, merger can be an effective combat tactic if you are the stronger ship, but will be ineffective if you are the weaker ship
- On the Aegis, merger can be effective when timed with system intrusion (weapon intrusion to prevent the enemy ship from firing during a merger, shield intrusion to allow for direct hits to the hull during a merger, or engine intrusion to slow the enemy ship's turn rate)

One circle flow[ | ]
- One circle flow occurs when both ships at a merger turn in the same direction, so that they are flying towards each other
- In one circle flow, the ship with the smaller turn radius will gain an advantage, potentially being able to maneuver into a pursuit position
- If neither ship gains an advantage in one circle flow, another merger will occur on the other side of the circle
- To initiate one circle flow at a merger, turn in the same direction as the enemy; on the viewscreen, if the enemy begins moving towards the left, turn left; if the enemy begins moving towards the right, turn right
- If you begin turning first during a merger (a "lead turn"), you may induce the enemy to turn in the same direction, leading the enemy into one circle flow
Two circle flow[ | ]
- Two circle flow occurs when both ships at a merger turn in the opposite directions, so that they are flying away from each other
- In two circle flow, the ship with the faster turn rate (whichever ship traverses their circle faster) will gain an advantage, potentially being able to maneuver into a pursuit position
- If neither ship gains an advantage in two circle flow, another merger will occur in the same location as the initial merger
- In two circle flow, the time between mergers is twice as long as in one circle flow
- To initiate two circle flow at a merger, turn in the opposite direction as the enemy; on the viewscreen, if the enemy begins moving towards the left, turn right; if the enemy begins moving towards the right, turn left
- It is often effective to "wiggle" into two circle flow, by first making a lead turn in one direction, inducing the enemy ship to turn the same way as if into one circle flow, and then turning the opposite direction just before merger, entering two circle flow
- Two circle flow increases the distance between the two ships, providing an escape advantage to both ships
Reverse turn merger[ | ]
- A reverse turn merger is performed by putting the engines into reverse while turning towards the enemy ship; it is like "one-circle flow in reverse"
- A reverse turn merger will keep the enemy ship in your firing arc longer than one- or two-circle flow, and decrease your ship's turn radius, making it easier to take a pursuit position
- Reverse turns can be initiated before, at, or after merger
- A reverse turn initiated before merger will keep the enemy ship in your firing arc for the entire duration of the turn; however, a reverse turn initiated too early will allow the enemy to correct its course and enter another merger, and keeping the enemy ship in the firing arc may not be necessary or helpful if all the weapons are spent and recharging before you've reached the merger point
- A reverse turn at the merger point is difficult to time
- A reverse turn after the merger point will keep your ship out of the enemy's firing arc while you are performing the turn (and moving slowly)
- Once you have turned about 90 degrees, put the engines back into forward and attempt to establish a pursuit position (or prepare for another merger); the exact optimal timing of when to switch from reverse to forward will depend on the relative speed and positions of the two ships
- A reverse turn away from the enemy ("two-circle flow in reverse") is not recommended, as it will take twice as long to put the enemy back in your firing arc and expose your tail to the enemy during the turn
Z maneuver[ | ]
- Named for Lt. Zeeles, the "Z maneuver" is an advanced maneuver that involved "ramming" the oncoming enemy ship at merger in order to use ship deflector shields to accomplish a fast U-turn at merger
- When your ship comes close enough to an enemy ship for the two ships' deflector shields to make contact, the deflector shields will repel each other, causing the ships to "bounce" off each other (neither ship takes damage)
- In a "Z maneuver," the helm "rams" the enemy ship at the right speed and angle so that the resulting "bounce" causes your ship to quickly spin around quickly 180 degrees, placing it behind the enemy ship in a pursuit position
- Performed correctly, the "Z maneuver" is significantly faster than any other type of turn; performed incorrectly, the maneuver will cause your ship to spin around too much or too little
- Though many have attempted it, few pilots are able to consistently perform the Z maneuver
Escape maneuvers[ | ]
If the enemy ship enters into a pursuit position behind your ship (their nose to your tail), perform one or more of the following evasive maneuvers:
- If your ship is faster than the enemy ship, you may be able to escape their weapons range (or, on the Aegis, detection range) simply by increasing speed
- If your ship is more maneuverable than the enemy ship, a simple hard turn left or right may allow you to put the enemy into lag pursuit and possibly establish a pursuit position or a merger position, depending on the distance of the enemy ship
- If the enemy ship is very close, a "short stop" (putting the engines into reverse) may induce the enemy ship to overshoot and pass you, putting you into a pursuit position
- If the enemy ship is too distant for an effective short stop, a reverse turn will allow you to quickly face the enemy ship and establish a merger position
Torpedo dodging[ | ]
- It is possible to dodge incoming torpedoes by moving your ship out of the torpedo's way
- While dodging in any direction is technically possible, the most effective method for dodging torpedoes is to dodge by moving along the Z-axis out of the torpedo's way, either up ("jumping" the torpedo) or down ("ducking" the torpedo).
- Torpedo dodging is most effective when engine power is 3,000 or above; it is possible but difficult when engine power is 2,000-3,000; the ship moves too slowly to make torpedo dodging viable when engine power is below 2,000
- During dogfights, it is advised to leave enough Z-axis room for dodging, by staying between the enemy ship and Z-axis 0. For example, if the enemy ship is at +25, you will want your ship to be below it, to leave ample room to "duck" incoming torpedoes (between -60 and +25). If you were above +25, you'd have less room to "jump" the torpedo (between +25 and +60). Many pilots try to keep Z-axis around 0 during combat in order to provide maximum room for for both jumping and ducking torpedoes.